Placeholder Content Image

Garlic and Parmesan Piadinas with Italian Salsa

<p dir="ltr">Piadinas are Italian flatbread that is quite easy to cook and is usually served with salsa. You could also serve them on an antipasto platter. These tasty treats will impress the guests and leave your crowd wanting more. Here’s the easy recipe from Smeg’s cucina: </p> <p dir="ltr"><strong>Serves:</strong> 2 </p> <p dir="ltr"><strong>Ingredients:</strong> </p> <p dir="ltr">For Piadinas</p> <p dir="ltr">1 cup (150g) plain flour</p> <p dir="ltr">½ teaspoon baking powder</p> <p dir="ltr">½ teaspoon salt</p> <p dir="ltr">¼ cup olive oil</p> <p dir="ltr">1/3 cup warm milk</p> <p dir="ltr">2 cloves garlic finely sliced</p> <p dir="ltr">1 sprig rosemary finely chopped</p> <p dir="ltr">6 thymesprigs, leaves removed</p> <p dir="ltr">Extra olive oil to cook bread</p> <p dir="ltr">Salsa: </p> <p dir="ltr">1 punnet cherry tomatoes, quartered</p> <p dir="ltr">1/3 cup pitted olives</p> <p dir="ltr">1 tablespoon baby capers</p> <p dir="ltr">1/3 cup oregano leaves, picked</p> <p dir="ltr">Extra Virgin olive oil</p> <p dir="ltr"><strong>Method: </strong></p> <ol> <li dir="ltr" aria-level="1"> <p dir="ltr" role="presentation">Combine flour, baking powder and salt in a Smegstand mixer bowl with the dough hook attached. Add half of the olive oil, and warm milk and mix on low speed until combined</p> </li> <li dir="ltr" aria-level="1"> <p dir="ltr" role="presentation">Continue to knead for a few minutes until the dough is smooth and elastic. Cover andrest for 15 minutes.</p> </li> <li dir="ltr" aria-level="1"> <p dir="ltr" role="presentation">Meanwhile, heat remaining olive oil in a small saucepan with garlic, rosemary and thyme and cook until the herbs and garlic are fragrant. Set aside.</p> </li> <li dir="ltr" aria-level="1"> <p dir="ltr" role="presentation">Divide dough in half. Roll each half into a rough round, approx. 0.5cm thick</p> </li> <li dir="ltr" aria-level="1"> <p dir="ltr" role="presentation">Combine salsa ingredients together in a bowl with salt, pepper and olive oil.</p> </li> <li dir="ltr" aria-level="1"> <p dir="ltr" role="presentation">Heat a large heavy based frying pan over medium heat. Brush the base of the pan with extra olive oil. Gently place one dough round in the base and cook for a few minutes until the dough is golden on the base and bubbles appear on the surface. Turn the bread, brush the cooked side with half the garlic and herb olive oil mixture. Continue to cook until the bread is golden on the base. Remove and repeat with remaining dough and garlic and herb oil mixture.</p> </li> <li dir="ltr" aria-level="1"> <p dir="ltr" role="presentation">Serve piadinas warm with salsa.</p> </li> </ol> <p dir="ltr" style="line-height: 1.38; background-color: #ffffff; margin-top: 12pt; margin-bottom: 0pt; padding: 0pt 0pt 12pt 0pt;"><em> Image: Supplied </em></p> <p><span id="docs-internal-guid-cb473992-7fff-2903-989b-972c7acbd980"></span></p>

Food & Wine

Placeholder Content Image

The controversial cooking question on everyone’s lips

<p>As garlic is a common staple in many dishes around the world, there’s been a controversial question on everyone’s lips who use the spice in their dish.</p> <p>How much minced garlic equals one clove?</p> <p>Although the question might sound simple, the answer is anything but.</p> <p>It depends on how finely minced the garlic is as well as whether the chop is standardised and how big the clove of garlic is.</p> <p>This question has confused many as it depends on the chef’s personal preference. One person says that clove is a “useless measurement”.</p> <p>"clove" [is] a useless measurement. Look at the variation on this page—anywhere from 1/4 teaspoon to 1 tablespoon—that's a variation of 1200%. I use the conversion of 1 clove equals 1 teaspoon. I believe Cook's Illustrated does the same,” he said to<span> </span>Hotline<span> </span>in a<span> </span><a rel="noopener noreferrer" href="https://food52.com/hotline/13423-how-much-minced-garlic-equals-one-clove" target="_blank">thread</a>.</p> <p>However, others have disagreed. The answer that was “voted the best” in the thread says that minced garlic is a waste of time.</p> <p>“Sorry, I would toss the "packaged" garlic that has chemical preservatives in it in favor of spending the 20 seconds it takes to chop or mince fresh real garlic cloves,” they wrote.</p> <p>Others agreed with the best voted answer, saying “you will never get the flavour of fresh garlic from a jar so there is no equivalent”.</p> <p>One person commented explaining that they were from New Zealand and therefore preferred using pre-minced garlic as fresh garlic is quite expensive and they use it a lot in their cooking.</p> <p>One final commenter just praised anyone who was getting into the kitchen and trying to use garlic, as well as giving an answer to the question.</p> <p>"Yes, fresh garlic is best. Applause to anyone that is trying to be a better home chef, no matter what kind of garlic you are using."</p>

Food & Wine

Placeholder Content Image

Boost your veggie intake with a sweet potato chickpea burger

<p><span style="font-weight: 400;">Up your veggie intake with ease thanks to these sweet potato and chickpea burgers.</span></p> <p><span style="font-weight: 400;"><strong>Makes:</strong> 4</span></p> <p><span style="font-weight: 400;"><strong>Prep time:</strong> 20 + 30 mins chill</span></p> <p><span style="font-weight: 400;"><strong>Cooking time:</strong> 35 mins</span></p> <p><strong>Ingredients</strong></p> <ul> <li><span style="font-weight: 400;">600g sweet potato, peeled, halved lengthways</span></li> <li><span style="font-weight: 400;">400g can chickpeas, rinsed, drained</span></li> <li><span style="font-weight: 400;">1 small red onion, finely chopped</span></li> <li><span style="font-weight: 400;">2 garlic cloves, crushed</span></li> <li><span style="font-weight: 400;">1/2 lemon, juiced</span></li> <li><span style="font-weight: 400;">2 tbs smokey chipotle spice blend or fajita seasoning</span></li> <li><span style="font-weight: 400;">1/2 cup flat-leaf parsley leaves, finely chopped</span></li> <li><span style="font-weight: 400;">1 cup fresh breadcrumbs</span></li> <li><span style="font-weight: 400;">¼ cup raw couscous</span></li> <li><span style="font-weight: 400;">olive oil cooking spray</span></li> <li><span style="font-weight: 400;">hamburger buns </span></li> <li><span style="font-weight: 400;">Wedges iceberg lettuce</span></li> <li><span style="font-weight: 400;">Onion jam &amp; chipotle mayonnaise, to serve</span></li> </ul> <p><strong>Methods</strong></p> <ol> <li><span style="font-weight: 400;">Chop the sweet potato into 3cm chunks. Place onto a microwave-safe plate. Cover with a damp paper towel. Microwave 7-8 minutes or until just tender when tested with a skewer. Drain any excess water.  Smash with a fork then transfer to a bowl. Cool 15 minutes.</span></li> <li><span style="font-weight: 400;">Combine chickpeas, onion, garlic, lemon juice and spice in a food processor. Season, process until mixture almost comes together. Add to the sweet potato with the parsley, breadcrumbs and raw couscous. Shape mixture into 4 patties. Place on a lined baking tray, cover and refrigerate for 30 minutes to firm up if time permits. </span></li> <li><span style="font-weight: 400;">Place a flat tray into the oven. Preheat oven and tray 220°C fan forced. Spray both sides of the patties with oil. Place onto the hot tray. Cook 15 minutes, turn and cook for a further 10 minutes until light golden.</span></li> <li><span style="font-weight: 400;">To serve, spread onion jam over the base of burger buns. Top with lettuce and sweet potato pattie. Drizzle with chipotle mayonnaise. Serve.</span></li> </ol> <p><em><span style="font-weight: 400;">Recipe credit of <a href="http://australiansweetpotatoes.com.au/">Australian Sweet Potatoes</a>.</span></em></p>

Food & Wine

Placeholder Content Image

Entertain with ease: Avocado, garlic and cheese pull-apart bread

<p><span>Impress friends and family with this fabulous and easy pull apart</span>.</p> <p><strong>Time to prepare: </strong>20 minutes</p> <p><strong>Cooking time: </strong>15 minutes</p> <p><strong>Serves: </strong>4 to 6</p> <p><strong>Ingredients</strong></p> <p><span>1 loaf sourdough bread </span></p> <p><span>1 ripe avocado, peeled and halved lengthways</span></p> <p><span>1 tbs olive oil</span></p> <p><span>2 garlic cloves, crushed</span></p> <p><span>1 tbs lemon juice</span></p> <p><span>1½ cups grated 3-cheese mix </span></p> <p><span>Salt and pepper to season</span></p> <p><strong>Directions</strong></p> <p><span>1. Preheat oven to 200˚C/180˚C fan-forced. </span></p> <p><span>2. Using a sharp knife, deeply cut the bread into a honeycomb pattern (don’t cut through the base of the loaf).</span></p> <p><span>3. Scoop avocado flesh into a bowl and add oil, garlic and lemon juice and seasoning, and lightly mash with a fork.</span></p> <p><span>4. Gently ease bread open and spoon avocado mixture into the loaf.</span></p> <p><span>5. Repeat using cheese. </span></p> <p><span>6. Place loaf onto a large sheet of foil and loosely wrap. Place on a baking tray and bake for 12 minutes. </span></p> <p><span>7. Uncover and bake for a further 8-10 minutes until hot and golden. <br /></span></p> <p><span><em>Recipe courtesy of <a rel="noopener" href="http://australianavocados.com.au/" target="_blank">Australian Avocados</a></em>. <em>Republished with permission of <a rel="noopener" href="https://www.wyza.com.au/recipes/avocado-garlic-and-cheese-pull-apart-bread.aspx" target="_blank">Wyza.com.au</a>.</em></span></p>

Food & Wine

Placeholder Content Image

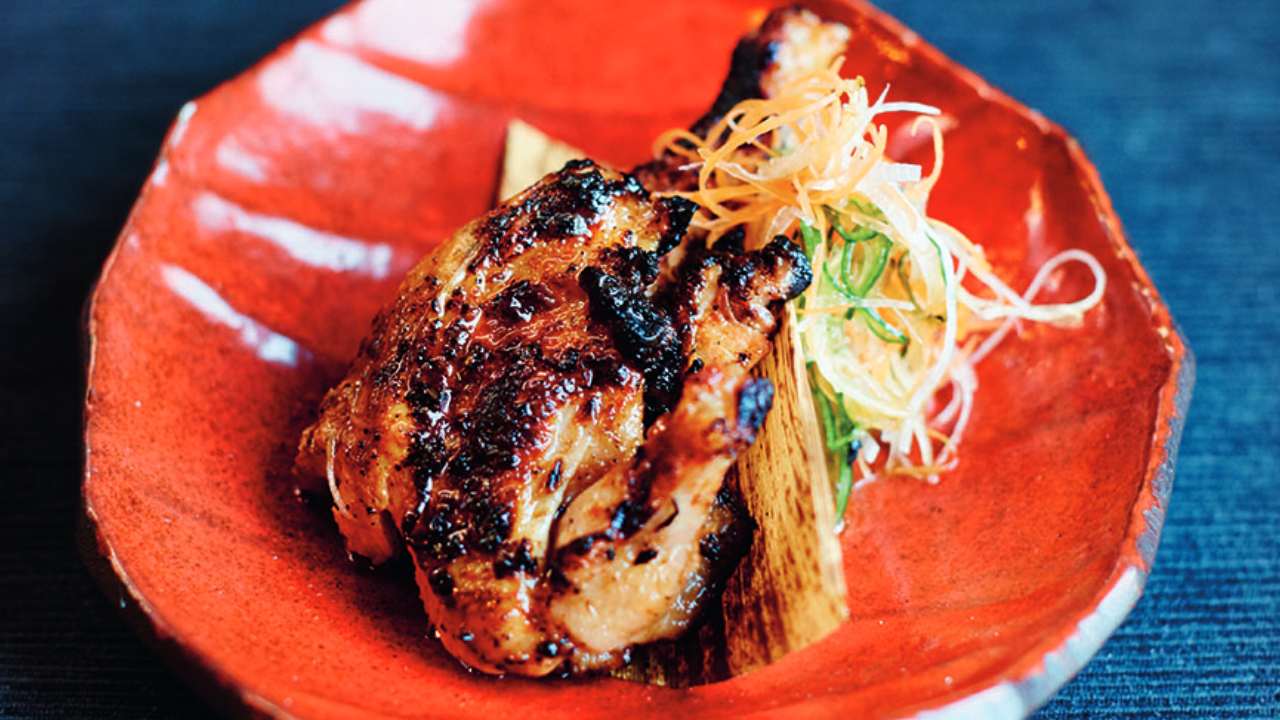
Miso-grilled baby chicken with lemon garlic chilli dipper

<p>So here we have some baby chicken, or, as the French call it, poussin. Quite possibly a far better name; after all, eating the ‘baby’ of something isn’t always such an appealing idea. It does, however, help to describe it on a menu.</p> <p>I use baby chicken for this because not only does the skin caramelise very quickly but the flesh cooks through before the skin starts to burn – perfect for a robata grill or your home barbecue.</p> <p><strong>Ingredients</strong></p> <p>2 baby chickens, aka poussins</p> <p><strong>Marinade</strong></p> <p>100ml den miso (find out how to make it<span> </span><a rel="noopener" href="http://www.marthastewart.com/965458/nobus-den-miso" target="_blank"><span>here</span></a>)</p> <p>1–2 green chillies, chopped (quantity depends on how much you can handle)</p> <p><strong>Lemon-garlic-chilli dipper</strong></p> <p>100ml sake</p> <p>2 tablespoons dark soy sauce</p> <p>1 scorcher of a red chilli, finely chopped</p> <p>2 teaspoons green Tabasco sauce</p> <p>2 teaspoons fresh garlic purée</p> <p>2 teaspoons yuzu juice</p> <p>2 tablespoons lemon juice</p> <p>2 tablespoons olive oil</p> <p><strong>Daikon salad</strong></p> <p>100g daikon</p> <p>50g carrot</p> <p>50g cucumber</p> <p>5 or 6 mint leaves</p> <p>10 coriander leaves, with a bit of stem left on</p> <p>10ml yuzu juice</p> <p>a few drops of dark soy sauce</p> <p>a few drops of extra virgin olive oil</p> <p><strong>Directions</strong></p> <p>1. Make the marinade by mixing the den miso and the chillies together. Use a sharp knife to cut each poussin clean in half and make a couple of score marks, one into the fat part of the drumstick and the other into the thigh. Marinate in the miso-chilli marinade for at least 6 hours and up to 12 hours.</p> <p>2. To make the dipper, whisk all the ingredients, except the oil. Slowly whisk in the oil until emulsified.</p> <p>3. To make the salad, thinly slice the daikon on a Japanese mandoline and layer the slices in piles of 5 or 6 and, using a knife, shred very thinly. Do the same with the carrot and cucumber and mix together. Add the mint and coriander leaves and drizzle with the yuzu, soy sauce and extra virgin olive oil.</p> <p>4. Set up your barbecue and get the charcoal super-hot – the flames start to die down a little, and the embers will be glowing – then put your poussins on the grill. If you’re concerned about the poussins not being cooked through enough and burning, take off the barbecue and finish cooking in a hot oven, about 180°C, for 8–10 minutes. To test the chicken to see if it’s fully cooked, insert a thin metal skewer or the sharp end of small knife into the thickest part of the thigh, pause for a couple of seconds, pull it and hold the skewer to your lip. Feel burning? It’s cooked through.</p> <p>5. Once cooked, serve it up as it is, or, if you want to get a little bit fancier, chop it up into smaller pieces. We serve this in the restaurant with the shredded daikon salad on the side, which is a nice and refreshing contrast to the miso and chilli.</p> <p><strong>Tips</strong></p> <p>This marinade is extremely versatile: use it for salmon belly, scallops, steaks, even tofu. It is also a very good sauce base: just add some mustard and vinegar and serve with sashimi or caramelised onions and it will be your lamb chop’s best mate.</p> <p><em>This is an edited extract from<span> </span><a rel="noopener" href="http://t.dgm-au.com/c/185116/69171/1880?u=http%3A%2F%2Fwww.booktopia.com.au%2Fjunk-food-japan-scott-hallsworth%2Fprod9781472919922.html" target="_blank"><span>Junk Food Japan</span></a><span> </span>by Scott Hallsworth, Bloomsbury Publishing, RRP $52.99. Photography © David Loftus.</em></p> <p><em>Written by Wyza. Republished with permission of <a href="https://www.wyza.com.au/recipes/miso-grilled-baby-chicken.aspx">Wyza.com.au.</a></em></p>

Food & Wine

Placeholder Content Image

Chinese hot pot with Asian greens and chilli-garlic oil

<p>Stave off the winter chill with this tasty Chinese hot pot. With an added hit of chilli, it's sure to keep you warm on a cold night!</p> <p><strong>Ingredients:</strong></p> <ul> <li>½ brown onion</li> <li>1 knob ginger</li> <li>4 cloves garlic</li> <li>½ long red chilli</li> <li>2 spring onions</li> <li>1 tbsp sesame seeds</li> <li>2 tbsp olive oil</li> <li>1 tsp sesame oil</li> <li>300g pork mince</li> <li>1tsp Chinese five spice</li> <li>1 cube chicken stock</li> <li>3 cups boiling water</li> <li>1 ½ tbsp salt-reduced soy sauce</li> <li>70g baby spinach leaves (handful)</li> <li>300g ramen noodles</li> </ul> <p><strong>Directions:</strong></p> <ol> <li>Bring a medium saucepan of salted water to the boil. Finely slice the brown onion. Peel and finely grate the ginger. Peel and crush the garlic. Finely slice the long red chilli (remove the seeds if you don’t like heat). Finely slice the spring onion.</li> <li>Heat a large saucepan over a medium-high heat. Add the sesame seeds and toast, stirring, for 3 minutes, or until golden. Remove from the pan and set aside. Add ¼ of the olive oil, the sesame oil and the pork mince and cook, breaking up with a wooden spoon, for 5 minutes, or until browned. Remove from the pan and set aside. Toasting sesame seeds before adding them as a garnish to the hot pot boosts flavour and adds extra crunch.</li> <li>Add ¼ of the olive oil and the brown onion to the same pan on medium-high heat and cook for 5 minutes, or until softened. Add the ginger, ¼ of the garlic and the Chinese five spice. Cook for 1-2 minutes, or until fragrant. Add the crumbled chicken stock cube, boiling water and salt-reduced soy sauce. Simmer for about 3 minutes to allow the flavours to infuse.</li> <li>Meanwhile, heat a small saucepan over a medium heat. Add the long red chilli, the remaining garlic and the remaining olive oil and cook for 4 minutes, or until the chilli and garlic are soft and fragrant.</li> <li>Add the ramen noodles to the saucepan of boiling water and cook for 3 minutes or until soft. Drain and rinse under cold water. Add the drained noodles and the baby spinach leaves to the broth and season to taste with salt and pepper.</li> <li>Divide the noodles, baby spinach leaves and broth between bowls and top with Chinese pork. Sprinkle with sesame seeds and spring onion. Drizzle over the chilli-garlic oil (if using).</li> </ol> <p><em>Recipe supplied by <a href="http://www.dpbolvw.net/click-8340400-12931890">HelloFresh</a>.</em></p> <p><em>Republished with permission of <a href="https://www.wyza.com.au/recipes/chinese-hot-pot-with-asian-greens-and-chilli-garlic-oil.aspx">Wyza.com.au</a>.</em></p>

Food & Wine

Placeholder Content Image

Coles leaves customers disappointed after forgetting main ingredient in this family favourite

<p><span>Coles is receiving criticism after disappointed customers discovered that the garlic bread they purchased was just a dry, plain bread roll without any filling.</span></p> <p><span>A customer has shared photos of the Twin Pack Garlic Baguette, showing that the garlic and parsley butter promised on the packet is noticeably missing.</span></p> <p><span>One customer took their complaint to Facebook to warn others from purchasing the same item.</span></p> <p><span>“I'm having a hard time locating the ‘garlic and parsley butter’ that it's apparently filled with,” Rebecca Mawhinney explained.</span></p> <p style="text-align: center;"><span><img width="498" height="375" src="https://oversixtydev.blob.core.windows.net/media/7818742/1_498x375.jpg" alt="1 (142)"/></span></p> <p><span>The frustrated customer purchased the garlic bread from a Sydney store only to discover it was missing the key ingredients when she was preparing it for dinner.</span></p> <p><span>Rebecca has been joined with many other shoppers to complain about the disappointing item.</span></p> <p><span>“Wow Coles! Garlic bread ... without the butter or the garlic ... isn't that just called bread? Not happy,” another customer wrote.</span></p> <p><span>“I think your Coles garlic bread is missing something. Damn it! I guess I got what I paid for,” one said.</span></p> <p><span>A Coles spokesperson told <a href="http://www.dailymail.co.uk/news/article-5781513/Coles-slammed-furious-customers-garlic-baguette-revealed-dry-dough.html" target="_blank"><em><strong><span style="text-decoration: underline;">Daily Mail Australia</span></strong></em></a> the supermarket “pride themselves” on their “quality products”.</span></p> <p><span>“Coles takes the quality of all our products seriously,” they said.</span></p> <p style="text-align: center;"><span><img width="497" height="280" src="https://oversixtydev.blob.core.windows.net/media/7818743/3_497x280.jpg" alt="3 (34)"/></span></p> <p><span>“We have contacted the customer and will follow up with our supplier to investigate the matter. </span></p> <p><span>“We encourage customers to return any item that they’re not 100% happy with, to their nearest store for a full refund or replacement.”</span></p> <p><span>Have you had a bad experience with Coles garlic bread? If so, tell us about it in the comments below. </span></p>

Food & Wine

Placeholder Content Image

Garlic focaccia with asparagus, chilli hummus and poached eggs

<p>If you love poached eggs, you’re going to love this healthy and oh-so delicious dish which is perfect for breakfast, lunch or dinner.</p> <p><strong><span style="text-decoration: underline;">Serves</span><span style="text-decoration: underline;">:</span> </strong>1</p> <p><strong><span style="text-decoration: underline;">Ingredients:</span></strong></p> <ul> <li>2 soft poached eggs</li> <li>3 asparagus spears, trimmed</li> <li>1 piece of Turkish bread, toasted</li> <li>3 tbsp. spicy hummus</li> <li>1 tbsp. spicy dukkha</li> <li>1 garlic clove, crushed</li> <li>2 tbsp. olive oil </li> </ul> <p><strong><span style="text-decoration: underline;">Method:</span></strong></p> <ol start="1"> <li>Pre-heat grill to high.</li> <li> Cut Turkish bread in half horizontally.</li> <li> In a small mixing bowl, mix together the garlic and olive oil. Using a basting brush, brush the Turkish bread with the mixture and place under the grill. Make sure to keep an eye on it so it doesn’t burn!</li> <li>Heat a small saucepan of water until it begins to simmer. Use a spoon to create a whirlpool in the water and carefully crack the eggs into the center of the whirlpool.</li> <li>Turn the heat right down and let this sit for 3-4 minutes for a soft egg or 6-8 for a hard-poached egg.</li> <li>While the eggs are poaching, grab the asparagus and a peeler! Peel the asparagus into super thin strips.</li> <li>On a serving plate, layer the toasted garlic bread with hummus, peeled asparagus and the poached eggs. Sprinkle the spicy dukkha over the top and enjoy!</li> </ol> <p><strong>TIP 1:</strong> The asparagus tastes amazing raw, but you can cook it too! Once peeled, pan fry it with a small amount of olive oil and salt for 3 minutes (no need for longer as the strips are so thin!)</p> <p><strong>TIP 2:</strong> If you want to make your own spicy hummus place the below ingredients into a food processor and BLEND!</p> <p>Makes 2-3 cups:  2 cans of chickpeas (800g soaked), 1 tsp. cayenne pepper, 2 tbsp. lemon juice, 1 garlic clove, 1/2 cup olive oil (more if needed), small handful of coriander (optional), sprinkle of salt and pepper.</p> <p><em>Recipe courtesy of Leah Itsines on behalf of <a href="http://www.asparagus.com.au/" target="_blank"><span style="text-decoration: underline;"><strong>Australian Asparagus</strong></span></a>. </em></p>

Food & Wine

Placeholder Content Image

There’s a festival dedicated entirely to garlic

<p>The biggest celebration of garlic in the world, this annual Californian festival draws tens of thousands of people from around the world. It has been running for 39 years and there’s a big focus on charity, with the event raising millions of dollars for local schools and non-profits over the years.</p> <p>Food is a highlight and the festival uses more than two tonnes of the pungent bulb to cook up an epic feast. Gourmet Alley is the heart of the festival and chefs will be cooking up all sorts of garlicky delights, like seafood, pasta, stuffed mushrooms and all kinds of garlic bread. Vendors will also be selling more interesting options, like garlic ice cream or popcorn infused with garlic. Much of the cooking takes place outdoors in the impressive ‘pyro kitchen’, with chefs utilising huge flames.</p> <p style="text-align: center;"><img width="500" height="375" src="https://oversixtydev.blob.core.windows.net/media/39359/image__500x375.jpg" alt="Image_ (384)"/></p> <p>Over the festival’s three days there’s also live entertainment, arts and crafts, cooking competitions and more. Keep an eye out for Miss Gilroy Garlic, the festival’s beauty queen, who is chosen in a pageant in May. The 2017 queen is Maggie Pickford and she will be on hand (crown and all) during the festival to judge competitions and host events.</p> <p><span style="text-align: center;"> </span><iframe width="560" height="315" src="https://www.youtube.com/embed/cFhW8xeIETM" frameborder="0" allowfullscreen="" style="text-align: center;"></iframe></p> <p><strong>Where is it?</strong></p> <p>The festival is held in the town of Gilroy, the Garlic Capital of the World. Gilroy is in Santa Clara County in California, a region just south of San Francisco. Guests can even catch a special Garlic Train from nearby San Jose station to reach the event.</p> <p><strong>When is it?</strong></p> <p>The Gilroy Garlic Festival is held over the last weekend of July.</p> <p><strong>How much is it?</strong></p> <p>Tickets are priced at $20 for adults and $15 for seniors.</p>

International Travel

Placeholder Content Image

Indian roast chicken and pumpkin soup with garlic croutons

<p>Nadia Lim’s Indian roast chicken and pumpkin soup with garlic croutons is the perfect recipe to warm you up on a cold winter’s night.</p> <p><strong><span style="text-decoration: underline;">Serves:</span></strong> Five</p> <p><strong><span style="text-decoration: underline;">Ingredients:</span></strong></p> <ul> <li>400g pumpkin, peeled and diced 1-2cm</li> <li>400g orange kumara, peeled and diced 1-2cm</li> <li>3 teaspoons curry spice mix</li> <li>600g skinless, boneless chicken thighs</li> <li>1 leek</li> <li>1 brown onion</li> <li>1 carrot</li> <li>3 teaspoons curry spice mix</li> <li>4 cups chicken stock</li> <li>2 cups water</li> <li>1/2 cup coconut cream (shake well before opening)</li> <li>1 teaspoon runny honey</li> <li>1/2 teaspoon salt</li> </ul> <p><em>Garlic croutons</em></p> <ul> <li>3-4 garlic pita breads (store-bought)</li> </ul> <p><em>To serve (optional)</em></p> <ul> <li>1-2 tablespoons coconut cream</li> <li>3 tablespoons coriander leaves</li> </ul> <p><em>Curry spice mix</em></p> <ul> <li>4 teaspoons mild curry powder</li> <li>2 teaspoons garam marsala</li> <li>1 teaspoon ground ginger</li> </ul> <p><strong><span style="text-decoration: underline;">Method:</span></strong></p> <ol> <li>Preheat oven to 230°C. Line two oven trays with baking paper.</li> <li>Toss pumpkin, kumara, first measure of curry spice mix and olive oil on first prepared tray. Pat chicken dry, place on top of vegetables then season chicken and vegetables with salt. Roast for 15 minutes, until kumara is tender and chicken is cooked.</li> <li>Turn chicken halfway to ensure even cooking.</li> <li>While chicken and vegetables cook, finely dice leek and onion and grate carrot. Heat a drizzle of oil in a large pot on high heat.</li> <li>Cook leek, onion and carrot with a pinch of salt for about five minutes, or until soft.</li> <li>Add remaining curry spice mix and cook for one minute, until fragrant. Add stock, water, first measure of coconut cream and honey to pot with veggies and bring to the boil. Remove chicken from tray, set aside and keep warm. Add roasted pumpkin, kumara and salt to pot and simmer for 5 minutes.</li> <li>While soup simmers, cut pita breads into 2-3cm squares.</li> <li>Place on second prepared tray and bake for 5-6 minutes, or until golden brown and crunchy.</li> <li>Use two forks or clean hands to shred chicken into thin strips. Mash, blend or use a stick mixer to blitz soup until smooth, then season to taste with salt and pepper.</li> <li>To serve, divide soup between bowls and top with shredded chicken and garlic croutons. Garnish with a drizzle of coconut cream and a sprinkle of coriander leaves (if using).</li> </ol> <p>Mmm, doesn’t that sound delicious! What’s your favourite type of soup?</p> <p><em>Written by Nadia Lim. First appeared on <a href="http://www.stuff.co.nz/" target="_blank"><strong><span style="text-decoration: underline;">Stuff.co.nz</span></strong></a>.</em></p> <p><em><strong>Have you ordered your copy of the Over60 cookbook,</strong></em><strong> The Way Mum Made It</strong><em><strong>, yet? Featuring 178 delicious tried-and-true recipes from you, the Over60 community, and your favourites that have appeared on the Over60 website, <a href="https://shop.abc.net.au/products/way-mum-made-it-pbk" target="_blank"><span style="text-decoration: underline;">head to the abcshop.com.au to order your copy now</span></a>.</strong></em></p>

Food & Wine

Placeholder Content Image

Hearty beef cottage pie with garlic mash

<p>Nothing beats a home-made pie! This recipe combines the classic beef pie with a garlic mash that will soon become an all-time favourite.</p> <p><strong><span style="text-decoration: underline;">Ingredients: </span></strong></p> <ul> <li>400 g potatoes</li> <li>½ brown onion</li> <li>1 clove garlic</li> <li>2 carrots</li> <li>1 zucchini</li> <li>3 sprigs rosemary</li> <li>3 sprigs thyme</li> <li>2 tbs butter</li> <li>3 tbs milk</li> <li>1 tbs olive oil</li> <li>1 tbsp Dijon mustard</li> <li>1 tbs Worcestershire sauce</li> <li>1 tbs plain flour</li> <li>½ cup warm water</li> <li>1 cube beef stock</li> <li>300g diced beef</li> <li>2 stalks celery</li> </ul> <p><strong><span style="text-decoration: underline;">Method:</span></strong></p> <p>1. Boil a full kettle of water. Peel the potato and chop into 2 cm cubes. Peel and crush the garlic.<br /> <br /> 2. Place the potato and boiling water from the kettle in a medium saucepan over a high heat. Boil for 10-15 minutes, or until the potato is soft when pierced with a knife. Drain and set aside in a colander to allow the excess moisture to evaporate. Return the saucepan to a low heat and add the garlic, butter and milk. Cook for 1-2 minutes, or until fragrant. Turn off the heat. Return the potato to the saucepan and mash using a potato masher or fork. Season to taste with salt and pepper. Cover to keep warm.<br /> <br /> 3. Meanwhile, finely chop the brown onion, peel and dice the carrots, dice the zucchini and celery and pick and finely chop the rosemary and thyme leaves. Heat the olive oil in a medium frying pan over a medium-high heat. Add the brown onion, carrot, zucchini and celery and cook for 5-6 minutes, or until softened. Add the rosemary and thyme and cook for a further 1-2 minutes, or until fragrant.<br /> <br /> 4. Add the diced beef and plain flour and cook for 2 minutes, or until browned. Add the Dijon mustard, Worcestershire sauce (if using), warm water and crumble in the beef stock cube. Stir to combine. Reduce the heat to low and simmer for 10 minutes to develop the flavours.<br /> <br /> 5. Preheat the grill to high. Spoon the beef mixture into a small pie dish or individual ramekins. Top with the garlic mash. Place the pie under the grill and cook for 7-8 minutes, or until golden on top.<br /> <br /> 6. Remove the hearty beef cottage pie with garlic mash from the grill and divide between plates.</p> <p><em>Recipe courtesy of <a href="https://www.hellofresh.com.au/tasty/" target="_blank"><strong><span style="text-decoration: underline;">Hello Fresh</span></strong></a>. </em></p> <p><em><strong>Have you ordered your copy of the Over60 cookbook, </strong></em><strong>The Way Mum Made It</strong><em><strong>, yet? Featuring 175 delicious tried-and-true recipes from you, the Over60 community, and your favourites that have appeared on the Over60 website, <a href="https://shop.abc.net.au/products/way-mum-made-it-pbk" target="_blank"><span style="text-decoration: underline;">head to the abcshop.com.au to order your copy now.</span></a></strong></em></p>

Food & Wine

Placeholder Content Image

How I lowered my blood pressure without giving up butter

<p><strong><em>Sue Van Gaal is 77 years old and lives in Koo Wee Rup, Victoria. As well as her golfing interest, Sue passionately supports her children, Louise and Phillip, in breeding magnificent Warmblood horses for Dressage and Showjumping.</em></strong></p> <p>With a family background in nursing and medicine I understand all about healthy living. I have been an avid golfer for the past 18 years, an activity that has helped me cope with stressful jobs and family matters, and I have supported my body with natural supplements. However, I have one weakness… I’m a self-confessed butter-holic!</p> <p>I use animal (saturated) fats in most of my cooking, mainly because I don’t digest oil well, but also because I prefer the taste. Unfortunately, however, my preference likely contributed to my cholesterol and blood pressure levels creeping into the above normal range. At its highest, my total cholesterol reached 6.8mmol/L and by blood pressure reached 158/85mmHg, placing me at high risk of developing cardiovascular disease.</p> <p>I wasn’t keen on changing my dietary habits to improve these levels I have, however, always believed in taking natural supplements to support a healthy body, so my interest was piqued when, two-and-a-half years ago, my daughter suggested I participate in a clinical research trial for Kyolic Aged Garlic Extract (KAGE) to improve cardiovascular health – something she heard about after a visit to our naturopath.</p> <p>The study was being run by Associate Professor Karin Ried at the National Institute of Integrative Medicine in Hawthorn, Victoria. My high cholesterol and blood pressure levels made me a perfect candidate to participate. The clinical trial lasted 12 weeks after which time I found out I was actually in the placebo treatment group. Despite this, my total cholesterol level dropped to 5.8mmol/L and my blood pressure to 138/80mmHg – a pretty impressive placebo effect!</p> <p>The result inspired me to try taking the KAGE daily at the recommended dose, and to my delight, 6 months after using KAGE, my cholesterol levels improved further, dropping to 5.2mmol/L along with my blood pressure, dropping to 130/75mmHg. That was without making any dietary changes.</p> <p>Since seeing these amazing results, taking KAGE has become part of my daily natural supplement intake. I was really pleased to find a natural medicine option, I am delighted I can still eat all my buttery treats too!</p> <p>The advice I would give others is to find out whether there are natural medicine options that can benefit your health as it has mine.</p> <p><em>This advice is not meant as a substitute for professional medical advice. Before you change your diet, speak to your doctor. </em></p>

Body

Placeholder Content Image

Roasted chicken legs with cloves of garlic

<p>Even the most defiant garlic denier will be won over by this French classic. The garlic isn't overwhelming at all, but melts into the sauce. Serve with crusty bread and something green on the side.</p> <p><strong><span style="text-decoration: underline;">Serves:</span></strong> Four to six</p> <p><strong><span style="text-decoration: underline;">Ingredients:</span></strong></p> <ul> <li>3 tablespoons extra virgin olive oil</li> <li>4 heads garlic, broken into cloves and peeled</li> <li>2 onions, peeled and diced</li> <li>6 whole chicken legs, skin on but excess skin removed (about 1.2 kg)</li> <li>Salt and pepper</li> <li>1/4 cup red wine</li> <li>2 cups chicken stock</li> <li>12 baby new potatoes, halved</li> <li>4 sprigs fresh thyme</li> </ul> <p><strong><span style="text-decoration: underline;">Method:</span></strong></p> <ol> <li>Season the chicken on both sides with salt and pepper, and set aside.</li> <li>Heat the oven to 180°C.</li> <li>Heat the olive oil in a large, heavy pan.</li> <li>Brown the chicken in two batches, cooking for about five minutes on each side.</li> <li>Remove to a large oven dish, big enough to take them all in a single layer.</li> <li>Turn the heat to medium and add the garlic and onions.</li> <li>Cook, stirring now and then, for five to 10 minutes.</li> <li>Add to the chicken and return the pan to the heat.</li> <li>Carefully pour in the wine to deglaze the pan, stirring to scrape up any sticky bits, followed by the chicken stock. Pour into the chicken dish and add the potatoes and thyme.</li> <li>Season well with salt and pepper, and transfer to the oven.</li> <li>Bake for about 40 minutes, until the chicken is cooked and the potatoes are tender.</li> <li>Serve on warmed plates, with the sauce spooned over the chicken and potatoes.</li> </ol> <p><em>Written by Lucy Corry. First appeared on <a href="http://www.stuff.co.nz/" target="_blank"><strong><span style="text-decoration: underline;">Stuff.co.nz</span></strong></a>. Image credit: Stuff.co.nz / Maarten Holl</em></p> <p><em><strong>Have you ordered your copy of the Over60 cookbook, The Way Mum Made It, yet? Featuring 178 delicious tried-and-true recipes from you, the Over60 community, and your favourites that have appeared on the Over60 website, <a href="/%20https:/shop.abc.net.au/products/way-mum-made-it-pbk" target="_blank"><span style="text-decoration: underline;">head to the abcshop.com.au to order your copy now</span></a>.</strong></em></p>

Food & Wine

Placeholder Content Image

One-pan lemon garlic chicken pasta

<p>With very little prep and made just in one pan, this one-pan lemon garlic chicken makes the perfect quick but tasty weeknight dinner. </p> <p><span style="text-decoration: underline;"><strong>Ingredients</strong>:</span></p> <ul> <li>2 tablespoons extra virgin olive oil</li> <li>500g boneless skinless chicken breast, cut into 2 centimetre pieces</li> <li>Salt and pepper</li> <li>4 cloves garlic, minced</li> <li>2 cups chicken stock</li> <li>1 cup water</li> <li>200g penne pasta</li> <li>1 lemon, zested and juiced</li> <li>1 lemon, sliced for garnish</li> <li>1 cup freshly shredded parmesan</li> <li>1 cup fresh basil</li> <li>½ cup toasted walnuts, chopped</li> <li>1 cup snap peas, chopped</li> </ul> <p><span style="text-decoration: underline;"><strong>Method</strong>: </span></p> <ol> <li>Season chicken with salt and pepper. In a large fry pan heat olive oil over medium high and brown chicken.</li> <li>Lower heat and add garlic, sauté with chicken for about one minute.</li> <li>Add chicken stock, water and pasta, bring to a boil then reduce heat to low.</li> <li>Cook covered on low for about fifteen minutes.</li> <li>Remove cover and let simmer for about five minutes or until liquid is reduced by half.</li> <li>Add snap peas. Remove from heat, add lemon juice, zest and parmesan cheese. Mix well.</li> <li>Adjust seasoning with salt and pepper as needed, mix in walnuts, fresh basil and then garnish with lemon wedges.</li> </ol> <p><em>Source: TipHero</em></p> <p><strong>Related links:</strong></p> <p><a href="/lifestyle/food-wine/2016/01/thai-green-beef-curry/"><strong><em><span style="text-decoration: underline;">Thai green beef curry</span></em></strong></a></p> <p><a href="http://www.oversixty.co.nz/lifestyle/food-wine/2016/01/chicken-mushroom-macadamias-stir-fry/"><strong><em><span style="text-decoration: underline;">Chicken, mushroom and macadamia stir-fry</span></em></strong></a></p> <p><strong><em><span style="text-decoration: underline;"><a href="/lifestyle/food-wine/2016/01/lamb-tomato-and-spinach-curry/">Lamb, tomato and spinach curry</a></span></em></strong></p>

Food & Wine

Placeholder Content Image

Trick to peel garlic in 30 seconds

<p>Let’s face it: peeling garlic is one of the most odious prepping tasks. It’s fiddly, it’s time-consuming and we somehow always manage to miss a bit of skin. But that’s all in the past now, because we’ve just discovered this nifty new trick that will have your cloves peeled in less than 30 seconds!</p> <p>The above video from Diply demonstrates just how easy your life will now be when it comes to preparing garlic. Simply stick a garlic bulb in a jar, cover, and shake as hard as you can (the fast motion is the key) for a half a minute. The bulb will separate and the skin will come off so your garlic cloves are ready to cook up straight away. </p> <p><strong>Related links:</strong></p> <p><em><strong><a href="/lifestyle/home-garden/2016/02/simple-trick-to-cleaning-dishwasher/"></a></strong></em></p> <p><em><strong><span style="text-decoration: underline;"><a href="http://www.oversixty.co.nz/lifestyle/home-garden/2016/01/dirty-home-items/">5 surprisingly dirty things in your house</a></span></strong></em></p> <p><em><strong><a href="/lifestyle/home-garden/2016/02/simple-trick-to-cleaning-dishwasher/"></a></strong></em></p> <p><em><strong><span style="text-decoration: underline;"><a href="http://www.oversixty.co.nz/lifestyle/home-garden/2016/01/tips-to-iron-quicker/">Clever tips to cut ironing time in half</a></span></strong></em></p> <p><em><strong><a href="/lifestyle/home-garden/2016/02/simple-trick-to-cleaning-dishwasher/"></a></strong></em></p> <p><em><strong><span style="text-decoration: underline;"><a href="http://www.oversixty.co.nz/lifestyle/home-garden/2015/12/9-nasty-things-you-really-should-throw-out-from-around-the-house/">9 nasty things you really should throw out NOW!</a></span></strong></em></p>

Home & Garden

Placeholder Content Image

Baked Camembert with garlic and rosemary

<p>A lovely baked Camembert infused with garlic and rosemary, served with crusty bread and breadsticks for dipping, will always be a winner.</p> <p><strong><span style="text-decoration: underline;">Serves</span>:</strong> 4</p> <p><strong><span style="text-decoration: underline;">Ingredients</span></strong>:</p> <ul> <li>250g whole Camembert cheese</li> <li>2 cloves garlic, finely sliced </li> <li>3 sprigs fresh rosemary</li> <li>Olive oil</li> </ul> <p><strong><span style="text-decoration: underline;">Method</span>:</strong></p> <p>1. Preheat oven to 180°C.</p> <p>2. Unwrap Camembert and place in oven-proof tray. Cut off top layer of skin and score the top of the cheese with a sharp knife.  Insert garlic slices and rosemary tips into the slits. Drizzle with a little oil. Bake in oven for 15 to 20 minutes, or until cheese is melted and oozing in the middle. Serve with bread and breadsticks.</p> <p><strong>Related links:</strong></p> <p><span style="text-decoration: underline;"><a href="http://www.oversixty.co.nz/lifestyle/food-wine/2015/12/guacamole/"><em><strong>Guacamole</strong></em></a></span></p> <p><span style="text-decoration: underline;"><a href="http://www.oversixty.co.nz/lifestyle/food-wine/2015/11/mashed-potato-balls/"><em><strong>Crispy mashed potato balls</strong></em></a></span></p> <p><span style="text-decoration: underline;"><a href="http://www.oversixty.co.nz/lifestyle/food-wine/2015/11/cauliflower-pizza/"><em><strong>Cauliflower pizza</strong></em></a></span></p>

Food & Wine

Placeholder Content Image

Easy cheesy garlic bites

<p>These delicious, explosive garlic bites are so full of cheesy goodness, we bet they’ll be the first thing to go at your next party.</p> <p><strong><span style="text-decoration: underline;">Ingredients:</span></strong></p> <ul> <li>Frozen scones/or dough</li> <li>3 Mozzarella cheese sticks.</li> <li>4 tablespoons of butter</li> <li>1 teaspoon of garlic powder</li> <li>1 tablespoon of parmesan</li> <li>1 teaspoon of Italian seasoning</li> <li>Sesame seeds</li> </ul> <p><strong><span style="text-decoration: underline;">Method: </span></strong></p> <ol> <li>Preheat oven to 200°C.</li> <li>Cut cheese sticks into four pieces each.</li> <li>Separate your scones and place a piece of cheese inside each one.</li> <li>Pinch the scone around the cheese to completely cover it.</li> <li>Place pinched side down on a baking sheet and sprinkle on sesame seeds. Bake until golden for about ten minutes.</li> <li>Melt butter and mix with garlic powder, parmesan and seasoning. Brush over scones.</li> <li>Serve immediately with marinara sauce.</li> </ol> <p><strong>Related links:</strong></p> <p><em><span style="text-decoration: underline;"><strong><a href="/lifestyle/food-wine/2015/07/cheddar-and-bacon-pies/">Mini cheddar cheese and bacon pies</a></strong></span></em></p> <p><em><span style="text-decoration: underline;"><strong><a href="/lifestyle/outdoors/2015/07/spicy-chicken-wings/">Spicy chicken wings</a></strong></span></em></p> <p><em><span style="text-decoration: underline;"><strong><a href="/lifestyle/food-wine/2015/08/french-onion-soup/">French onion soup</a></strong></span></em></p>

Food & Wine

Our Partners